

Ready to get your next 10,000 subscribers?
Join thousands of creators who use Subscribr to create faster, better YouTube videos.

YouTube Studio on a Budget: Professional Results Without Breaking the Bank
Dreaming of creating high-quality YouTube videos but worried about the cost of a professional studio setup? You're not alone. Many aspiring creators face budget constraints and the perceived need for expensive gear to achieve a polished look and sound. The good news is, you absolutely can build an effective, professional-looking home YouTube studio without overspending.
This guide will show you how to optimize your space, select budget-friendly equipment, and use smart DIY solutions to elevate your production value, addressing the common pain points of high costs and inconsistent quality. By focusing on the fundamentals, you can create a studio setup that allows your content to shine, even on a tight budget.
Why Your Studio Setup Matters (Even a Budget One)
While your content's quality and value are paramount, the technical presentation significantly impacts viewer perception and retention. Consistent, clear audio and video make your content easier and more enjoyable to watch. A clean, well-lit background helps you look more professional and keeps viewers focused on you, not distractions.
Think of your studio setup as the stage for your performance. It doesn't need to be elaborate, but it needs to be functional and present you in the best possible light (literally!). Improving your production value doesn't require breaking the bank; it requires smart choices and understanding where to invest your limited funds for the biggest impact.
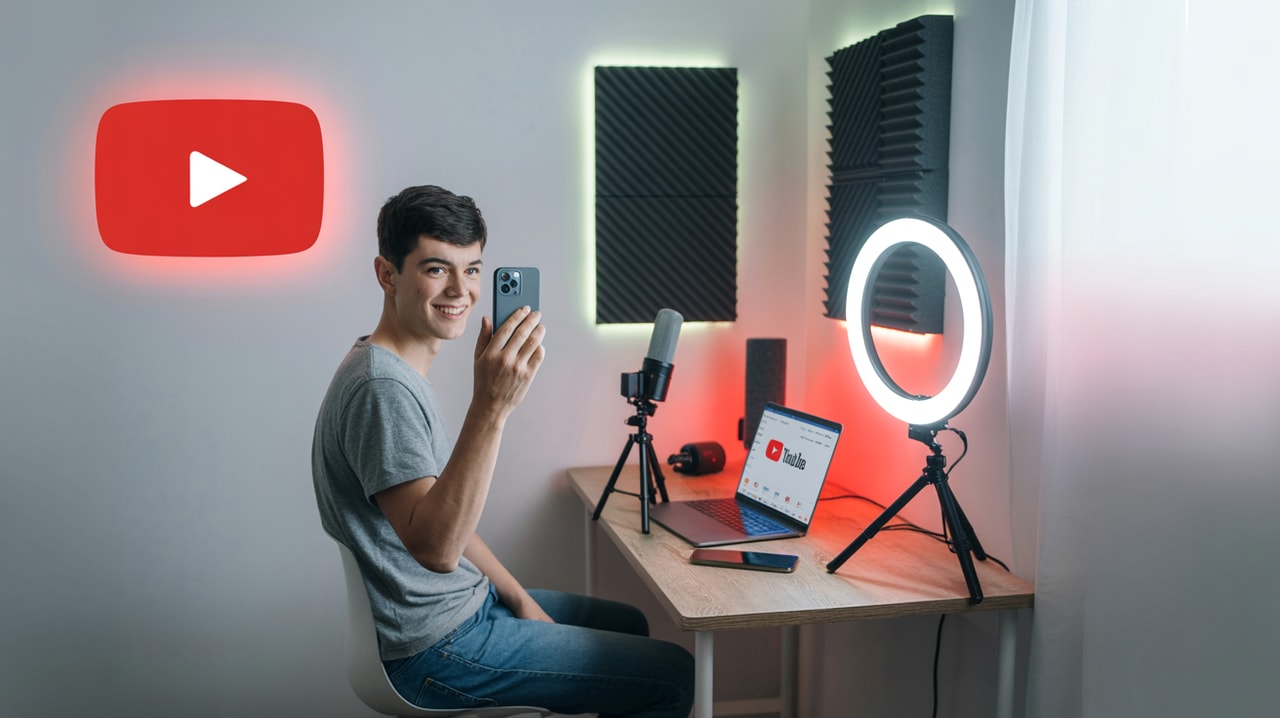
Essential Equipment on a Budget
You don't need the latest cinema camera or a soundproof booth to get started. Focus on the core components that deliver the most significant improvement for your money: your camera, your audio, and your lighting.
Camera: Use What You Have (Mostly)
For many new creators, the best camera they own is already in their pocket: their smartphone. Modern smartphones can shoot in high definition, often 4K, which is more than sufficient for YouTube.
Budget-Friendly Camera Tips:
- Start with your smartphone: Ensure good lighting and stable footage (use a cheap tripod or stand).
- Webcams: A decent webcam can be an upgrade from a very old phone or built-in laptop camera and offers convenience for desk-based content.
- Older DSLRs/Mirrorless Cameras: If you or a friend have an older model gathering dust, these can often provide excellent video quality. Look for models with good video features on the used market.
Remember, the camera is just one part of the equation. Don't spend a large portion of your budget here initially if your phone is capable.
Audio: Where to Invest First
If there's one area where you should allocate a significant portion of your budget, it's audio. Viewers are often more forgiving of imperfect video than they are of poor, noisy, or muffled audio. Clear sound ensures your message is heard and understood.
Budget-Friendly Audio Solutions:
- Lavalier Microphones: Small clip-on mics are incredibly effective and budget-friendly. The Boya BY-M1 is frequently recommended in budget gear guides and videos (like those found in our research for this article) and offers a significant audio quality jump for a low price. These are great for speaking directly to the camera.
- USB Microphones: For commentary, podcasts, or voiceovers, a budget USB microphone that sits on your desk can be a good option. Look for recommendations under $50-$100. Videos discussing "best cheap microphone for youtube" often highlight models in this range.
- Minimize Background Noise: This is free! Record in a quiet room. Turn off fans, air conditioners, or anything else making noise.
- DIY Acoustic Treatment: Soft surfaces absorb sound. Record in a room with carpets, curtains, or even hang blankets or moving pads on walls to reduce echo and reverb. This can make a huge difference in audio clarity without expensive foam panels.
As highlighted by YouTube strategy experts, a functional setup can be achieved for as little as $15, primarily for a budget lavalier microphone, emphasizing the critical importance of audio even with minimal investment.
Lighting: Shaping Your Scene
Good lighting is crucial for a professional look, making your video clear and visually appealing. You don't need powerful, expensive studio lights to achieve this.
Budget-Friendly Lighting Techniques:
- Natural Light: The best free light source is the sun. Position yourself facing a window for soft, even light. Avoid direct sunlight, which can be too harsh. Film during the day when natural light is strongest and most consistent.
- Desk Lamps: As suggested by YouTube strategy insights, inexpensive desk lamps (often under $50) can be used effectively as backlights, rim lights, or fill lights when combined with a single more capable light.
- Cheap LED Panels: Small LED panels are widely available online for reasonable prices. Look for ones with adjustable brightness and color temperature.
- DIY Diffusion: Harsh light creates unflattering shadows. Soften light sources (like desk lamps or bare bulbs) using diffusion. Parchment paper, a white t-shirt, or a cheap white shower curtain can be taped in front of a light source (safely!) to spread out the light and make it softer. Many popular videos on "DIY lighting for video" showcase these simple, effective techniques.
- Simple Setups: You don't always need traditional 3-point lighting. Sometimes, one well-positioned, diffused light source is enough to look great, especially when combined with natural light. The strategy tool mentions achieving a cinematic look with just one professional light and supplementing with cheap desk lamps.
Experiment with positioning lights and using diffusion to find a look you like. Even simple setups can make a dramatic difference.
Background and Set Design: Keeping it Clean and Focused
Your background sets the scene and can either enhance or distract from your message. On a budget, simplicity and tidiness are your best friends.
Budget-Friendly Background Tips:
- Tidy Up: The easiest (and free) option is to simply clean up a corner of a room. Remove clutter and distractions. A plain wall is perfectly fine.
- Fabric Backdrops: A solid color fabric (like a bedsheet or cheap material from a fabric store) can be hung behind you for a clean, consistent background. Gray, blue, or green are popular choices.
- DIY Paneling: For a bit more texture, consider using inexpensive materials like reclaimed wood pallets (check local listings or lumber yards for free/cheap options) or even large pieces of cardboard painted or covered in textured wallpaper samples.
- Shallow Depth of Field: If your camera/phone allows, blurring the background slightly can help separate you from it, making a less-than-perfect background look more professional. This is often achieved by having distance between you and the background and using a lower f-stop (if your camera has aperture control).
The goal is a background that supports, not competes with, your content.
Optimizing Your Space: Making the Most of What You Have
Finding the right spot in your home is key to building your budget studio.
Tips for Optimizing Your Filming Space:
- Find a Quiet Zone: Choose a room or corner that is furthest from common household noises (appliances, noisy roommates, street sounds).
- Control Light: Pick a spot where you can manage the light sources. Facing a window is great, but ensure you can block light if needed for consistency across different filming times.
- Consistency is Key: Try to film in the same spot with the same setup as much as possible. This builds a consistent look and feel for your channel, which viewers appreciate.
- Small Spaces Work: You don't need a large room. A corner of a bedroom, living room, or even a closet can work if optimized for sound and lighting. Dedicated studio spaces, even small ones, can significantly enhance production as noted in YouTube strategy discussions.
Putting It All Together
Building a budget studio is an iterative process. Start simple, test your setup, and make small improvements over time as your budget allows.
- Set up your camera: Place it at eye level.
- Position your main light: Usually slightly to one side and in front of you. Use diffusion.
- Add fill or back light (optional): Use desk lamps or other cheap lights to reduce harsh shadows or add separation from the background.
- Set up your microphone: Ensure it's close enough to capture clear audio (lav mics clip onto your shirt, USB mics on your desk).
- Check your background: Make sure it's clean, tidy, and visually appealing (or at least not distracting).
- Test! Record a short clip. Watch and listen critically. How does the audio sound? Is the lighting even? Is the background distracting? Adjust and repeat until you're happy.
Focus on creating great content first. Your budget studio is a tool to help you deliver that content effectively.
Monetization Angle: Affiliate Links
Once you've found budget-friendly equipment and DIY solutions that work for you, you can turn this knowledge into a potential monetization opportunity. Create videos or resources reviewing or demonstrating the specific cheap gear and DIY setups you use. Include affiliate links to the products you recommend on sites like Amazon. When viewers purchase through your links, you earn a small commission at no extra cost to them. This is a natural fit for content focused on budget solutions.
Enhancing Your Workflow with Subscribr
Creating a professional studio is just one piece of the puzzle. Planning, researching, and optimizing your video content are equally important for growth. This is where a platform like Subscribr can be invaluable, helping you maximize the impact of your budget setup.
While your studio handles the technical execution, Subscribr assists with the strategic side. You can use Subscribr's research tools to analyze successful videos and channels (even those with simple setups) to understand what content resonates in your niche. Subscribr's AI Script Writer can help you craft compelling scripts that make the most of your clear audio and visuals, ensuring your message is engaging from start to finish. Planning your video structure and key points with Subscribr's tools ensures you're making efficient use of your filming time in your new budget studio.
By combining a smart, budget-friendly studio setup with powerful content planning and analysis tools like those found in Subscribr, you create a robust system for YouTube growth without needing a massive upfront investment.
Conclusion
Building a professional YouTube studio on a tight budget is not just possible, it's how many successful creators start. By prioritizing clear audio, effective lighting (even natural or DIY), and a clean background, you can dramatically improve your production value without spending a fortune.
Focus your initial investment on a good microphone, utilize free or cheap lighting techniques, and tidy up your filming space. As you grow, you can gradually upgrade your equipment, but don't let a lack of expensive gear hold you back. Your creativity, valuable content, and a smartly assembled budget studio are all you need to start making professional-looking videos and building your audience on YouTube.


