

Ready to get your next 10,000 subscribers?
Join thousands of creators who use Subscribr to create faster, better YouTube videos.

How to Set Up Your YouTube Studio for Speed & Quality (Save Hours!)
Are you tired of spending more time setting up your gear than actually filming? Do you struggle to get consistent audio and video quality, making your editing a nightmare? You're not alone. Many growth-focused creators hit a wall when their filming setup becomes a bottleneck, eating away at precious content creation time and leading to inconsistent results.
The good news? You can dramatically streamline your YouTube workflow and boost your production value by strategically setting up your filming space and equipment. This isn't about buying the most expensive gear; it's about designing an environment that makes hitting record as effortless as possible, freeing you up to focus on delivering amazing content.
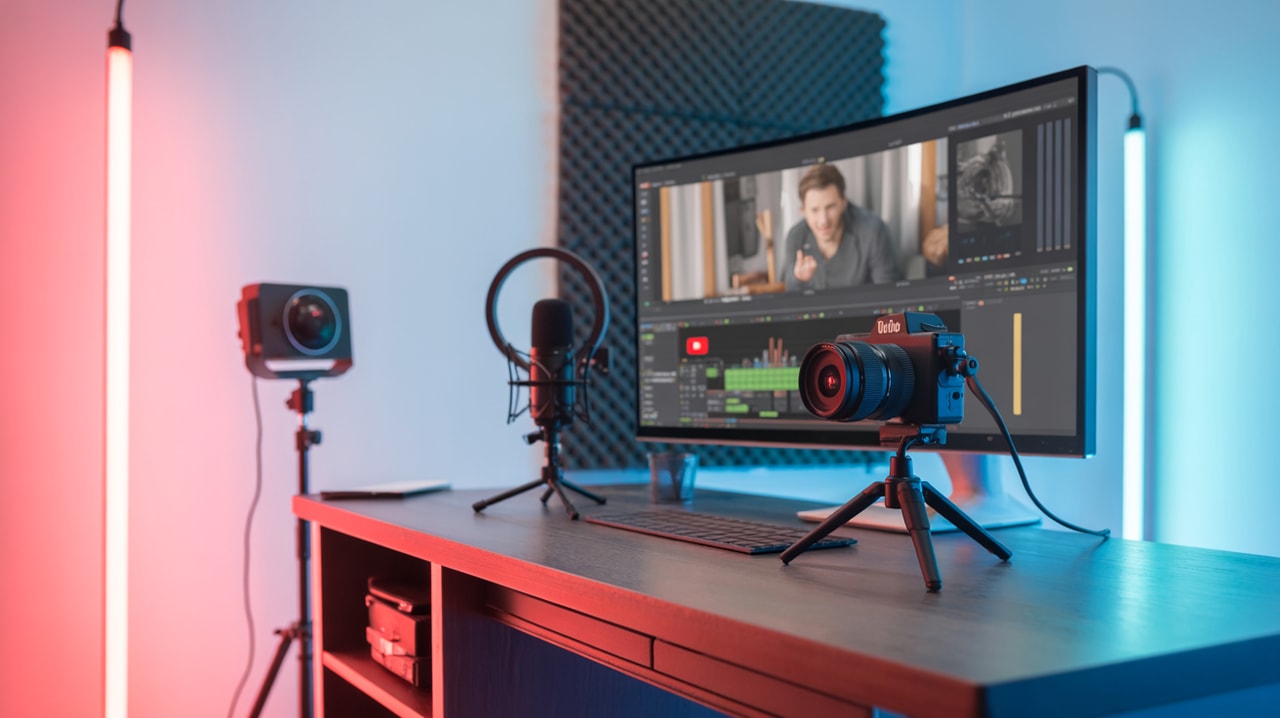
Why a Dedicated Filming Space is Your Productivity Power-Up
One of the biggest time sinks for creators is the constant setup and tear-down of equipment. Hauling lights, cameras, and microphones out for every shoot, then packing it all away, adds significant friction to your workflow. This is where a dedicated filming space becomes invaluable.
Think of it as building a production hub. If possible, designating a specific area in your home or office solely for filming allows you to keep your essential equipment—camera, lighting, microphone, backdrop—permanently or semi-permanently set up.
This simple change eliminates the setup ritual entirely. You walk into your space, turn on your lights, hit record, and you're ready to go. This saves not just minutes, but hours every week, allowing you to create more content or simply reclaim your time. Beyond saving time, a dedicated space makes achieving consistent audio and visual quality much easier, as your environment and gear placement remain constant.
Designing Your Studio for Maximum Efficiency
Once you have a dedicated space, the next step is optimizing its layout and elements for speed and quality.
1. Lighting is Key (and Should Stay Put): Good lighting is crucial for professional-looking video. Instead of setting up softboxes or ring lights for each shoot, find a configuration that works for your space and keep the lights in position. Use stands that are sturdy and won't easily get knocked over. If you use LED panels, consider mounting them or finding positions where they are out of the way but still provide consistent illumination. Having a consistent lighting setup means you'll spend zero time adjusting lights every time you film.
2. Audio Matters (Keep it Ready): Clear audio is non-negotiable. Whether you use a shotgun mic on a desk stand, a boom mic, or a lavalier, figure out the optimal placement and keep it ready. If using a desk mic, ensure its stand is secure and positioned correctly relative to your mouth. If using a lavalier, have it easily accessible and know exactly where to clip it for the best sound. Consider simple acoustic treatment in your space, like adding blankets or acoustic panels, to reduce echo and improve sound quality without needing complex setup each time.
3. Camera Placement & Settings: Find the best camera angle and distance for your typical shots. Use tape on the floor or furniture to mark your camera's position and your standing or sitting mark. This ensures consistent framing. Keep your camera settings (white balance, frame rate, resolution) consistent for your standard filming environment so you don't have to fiddle with them before every shoot.
4. Background Simplicity & Consistency: Your background contributes significantly to your video's look. A simple, uncluttered background works best. This could be a plain wall, a bookshelf, or a dedicated backdrop. Whatever you choose, keep it consistent. Avoid busy backgrounds that distract viewers. If you use a backdrop, have it set up on stands or mounted so it's always ready.
5. Organized Gear & Cables: Nothing slows you down like searching for a specific cable or accessory. Use cable ties, labels, and storage solutions (drawers, shelves, pegboards) to keep all your smaller gear organized and easily accessible. Knowing exactly where everything is saves frustrating minutes before and after filming.
Equipping Your Studio for Workflow Efficiency
While you can start simple, strategic investments in certain equipment can significantly boost efficiency and quality over time.
Smart Lighting Control: Consider smart plugs or a dedicated control panel (like a stream deck) to turn all your lights on and off with a single command. This might seem minor, but it removes a small point of friction each time you begin or end filming.
Quick-Release Plates & Mounts: Use quick-release plates on your camera and tripod/mounts. This allows you to quickly attach and detach your camera without screwing it on every time. Similarly, quick-release mounts for lights can save time during minor adjustments or when changing setups.
Reliable Storage: Invest in fast, reliable SD cards or external SSDs. Slow storage can increase transfer times and potentially cause recording issues. Having dedicated storage ready for filming ensures a smooth start.
Batteries Ready to Go: Keep your camera batteries charged and easily accessible. Having a system where you always know where the charged batteries are saves you from last-minute scrambling.
Investing strategically in quality gear, especially lights and microphones, pays dividends in consistent production quality, which viewers increasingly expect. As the team at Think Media Podcast notes, even a small investment like a stream deck for quick control can save time during filming, and viewers expect high-quality production from creators today.
Leveraging Subscribr for a Smarter Studio Workflow
While Subscribr is renowned for its AI script writing and channel analysis capabilities, its tools can indirectly support your studio setup and workflow optimization:
- Content Planning: Use Subscribr's Frame Development and Script Building Pipeline to plan your videos thoroughly before you even step into your studio. Knowing exactly what you need to film, the shots required, and the script flow means you can set up your studio precisely for that content, reducing on-the-fly adjustments.
- Performance Analysis: Subscribr's Channel and Video Intelligence features, including Outlier Score analysis, can show you which of your past videos performed best. Analyzing these videos might reveal insights into the filming style, background, or production quality that resonated most with your audience, helping you refine your optimal studio setup.
- Research & Ideation: Use Subscribr's Research Assistant to gather information on different studio setups, lighting techniques, or equipment recommendations. While not a substitute for hands-on testing, it can provide a starting point for research without leaving the platform.
By using Subscribr to nail down your content strategy and understand what resonates with your audience, you can make more informed decisions about how to set up your physical filming space for maximum impact and efficiency.
Evolving Your Setup Over Time
Your studio setup doesn't need to be perfect from day one. Start with what you have and build incrementally. The key is continuous improvement, always looking for ways to streamline your workflow and improve quality.
As the Think Media Podcast team advises, start basic and evolve. This could mean upgrading from your phone's built-in mic to a $20 lavalier, adding an affordable ring light, or eventually investing in better cameras or lenses. Each upgrade, when done strategically, should aim to either save you time or improve your output quality, contributing to a more efficient and professional workflow.
Conclusion: Build Your Productivity Hub
Setting up an efficient YouTube studio is one of the most impactful steps you can take to save time, reduce frustration, and consistently produce high-quality content. By dedicating a space, optimizing your layout for speed, investing strategically in gear, and keeping everything organized, you transform your filming area into a productivity hub. This allows you to spend less time on setup and more time doing what you do best: creating compelling videos that grow your channel. Start simple, make incremental improvements, and watch how a streamlined studio setup can revolutionize your YouTube workflow.


