

Ready to get your next 10,000 subscribers?
Join thousands of creators who use Subscribr to create faster, better YouTube videos.

Easy YouTube Lighting Setup for Beginners (No Pro Gear Needed!)
Are your YouTube videos looking dark, shadowy, or just plain... blah? You've got great content ideas, but the lighting isn't doing them justice. You might think you need expensive studio lights to get that crisp, professional look, but that's simply not true! The good news is you can dramatically improve your video quality using simple, affordable methods – often with stuff you already have lying around.
This guide is specifically for new creators who are feeling the pain points of inconsistent visual quality, technical complexity, and tight budgets. We'll break down how to light your videos effectively without needing a second mortgage for gear, helping you enhance your production quality and overcome those equipment fears right from the start. Think of this as building your minimum viable studio, focusing on the lighting aspect.
Why Good Lighting is a Game Changer for Your YouTube Videos
Before we dive into the how-to, let's understand why lighting matters so much. You could have the most expensive camera on the market, but if your lighting is bad, your video will still look amateurish. Conversely, even a smartphone camera can produce excellent results with good lighting.
Effective lighting makes your video look sharper, clearer, and more engaging. It helps viewers connect with you by making your face clearly visible. It sets the mood and tone of your video. Most importantly for YouTube's algorithm and viewer retention, better visual quality keeps people watching longer. As one expert strategy suggests, focusing on lighting is "significantly more impactful for enhancing video quality than simply upgrading camera gear." Good lighting elevates your production value tenfold, even with budget gear.
So, how can you light your videos without investing in costly professional equipment?
Harness the Power of Natural Light
Your first, best, and completely free light source is the sun! Natural light is soft, flattering, and abundant. Learning to use it effectively is the easiest way to instantly improve your video quality without buying a single piece of gear.
How to Use Natural Light:
- Find Your Window: The simplest setup is positioning yourself facing a large window. This makes the window your primary light source, or "key light."
- Face the Light: Sit or stand directly facing the window. This provides even lighting across your face. Avoid having the window behind you, as this will silhouette you and make your face dark.
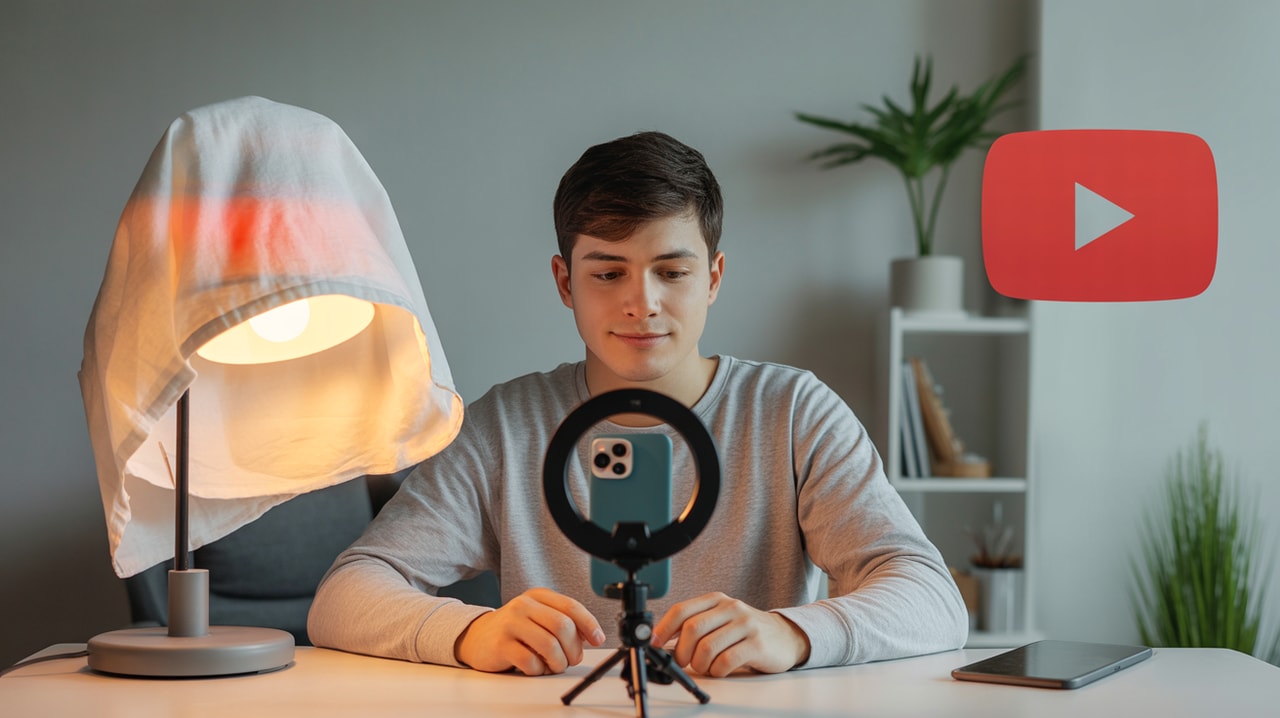
- Diffuser (Optional, but Recommended): Direct sunlight can be too harsh, creating strong shadows. If the sun is shining directly through your window, hang a sheer white curtain or even a white sheet over the window. This diffuses the light, making it softer and more flattering.
- Time of Day: The quality of natural light changes throughout the day. Overcast days provide soft, diffused light which is often ideal. The "golden hour" (shortly after sunrise or before sunset) offers warm, soft light, but it changes quickly. Midday sun can be very harsh without diffusion. Experiment to find the best time and window in your space.
- Positioning is Key: Even with natural light, pay attention to where the light is hitting you. Ideally, the light should come from slightly above and in front of you. Positioning yourself slightly off-center from the window can create a bit more dimension.
Using natural light is the ultimate budget-friendly solution and can yield fantastic results. As the Descript strategy suggests, simply "choose a location with abundant natural light" and "position yourself near a window" to get "nice, even lighting."
Building a Budget Artificial Lighting Setup
While natural light is great, it's not always available or consistent (hello, nighttime filming and cloudy days!). This is where affordable artificial lights come in. You don't need fancy LED panels right away. You can start with household items and build up gradually.
Using Household Items:
- Desk Lamps: Those cheap desk lamps you have? They can be powerful light sources! Position one in front of you, slightly off-center, as your main light.
- Floor Lamps: A floor lamp with a simple bulb can also work.
- Clip Lights: You can buy inexpensive clip lights from hardware stores. Pair them with energy-efficient LED bulbs.
Making Household Lights Work:
- Diffusion is Your Friend (Again): Just like with sunlight, bare bulbs can be harsh. You need to diffuse the light. You can buy small, cheap softboxes or diffusers online, or get creative! White paper or parchment paper taped carefully (and safely, away from the bulb!) can help diffuse the light. Bounce the light off a white wall or ceiling instead of shining it directly at you.
- Bulb Choice: Use LED bulbs for energy efficiency and cooler operation. Look for bulbs labeled "daylight balanced" (around 5000K-6500K) if you want a neutral look. Otherwise, consistent bulbs across your setup are more important than perfect color temperature to avoid weird color casts.
Stepping Up Slightly (Still Budget-Friendly):
Once you have a little budget, you can invest in dedicated, but still affordable, video lights.
- Small LED Panels: You can find small, battery-powered LED panels for under $50. These are compact and often have adjustable brightness and color temperature.
- Ring Lights: Ring lights are popular for a reason – they provide soft, even light that reduces shadows and creates an appealing catchlight in your eyes. You can find decent ring lights for $50-$100.
Even combining one slightly more professional light with cheaper options is a valid strategy. As suggested by Content Creators, you can "combine one professional LED light... with multiple cheap desk lamps" to "serve effectively as backlights, rim lights, or even color contrast lights." This allows for a "complete and creative lighting setup without the need for multiple expensive professional lights."
Understanding Simple Lighting Setups
You'll often hear terms like "key light," "fill light," and "backlight." Don't be intimidated! These are just names for the roles different lights play. You can achieve these roles with any light source – natural or artificial.
- Key Light: This is your main, strongest light source. It provides the primary illumination on your face. Position it slightly to one side (about 45 degrees off-center) and slightly above your eye level. This creates some natural shadows, giving your face dimension. (This is what your window or main desk lamp would be).
- Fill Light: The key light will create shadows on the opposite side of your face. A fill light softens or eliminates these shadows. It should be less intense than your key light and placed on the opposite side. You can use another lamp, a bounced light (shining a light onto a white card or wall), or even a reflector (a white surface that bounces light back onto you).
- Backlight (or Rim Light): This light is placed behind you, usually slightly off to one side and higher than your head. It creates a rim of light around your shoulders and hair, separating you from the background and adding depth to the shot. (A desk lamp placed behind you could serve this purpose).
A simple yet effective setup suggested by Content Creators is a two-light system: a key light and a rim light. Both should ideally be daylight balanced for consistent color, though consistency across your budget lights is more achievable and important initially.
You can start with just a key light (your window or one lamp) and add a fill light (a reflector or another lamp) and then a backlight as you acquire more sources. Even a single well-placed and diffused light is better than relying on overhead room lighting, which is often harsh and creates unflattering shadows.
Overcoming Equipment Limitations and Fears
It's easy to feel like you need the perfect gear before you can start. This is a major hurdle for new creators. The truth is, your creativity and understanding of principles are far more important than the price tag of your equipment.
- Start with Anything: Use your phone, a desk lamp, and a window. Just start creating!
- Learn by Doing: Experiment with positioning lights, diffusing them, and seeing how the light changes the look of your video. Watch other YouTubers and pay attention to how they are lit.
- Improvise: Can't afford a reflector? Use a white piece of foam board or even a white t-shirt stretched over a frame. No softbox? Bounce your light off a white wall.
- Consistency Over Perfection: It's better to have consistently decent lighting than occasionally perfect lighting. Find a setup that works for your space and stick to it.
- Focus on the Content: Ultimately, your video's value comes from your content and how you present it. Lighting is there to support that, not be the star of the show (unless your video is about lighting!).
Don't let the perceived technical complexity or cost hold you back. You can achieve professional-looking results with budget-friendly solutions and creativity. This directly addresses the pain points of technical complexity and budget constraints.
Putting It All Together for Instant Improvement
To make your videos look brighter and more professional without needing expensive gear, here's your simple action plan:
- Choose Your Location: Find a spot near a window or where you can easily set up a simple artificial light.
- Identify Your Key Light: This will be your window (facing it!) or your brightest budget light source. Position it slightly off-center and slightly above you.
- Add Diffusion: Soften your key light with a curtain, sheet, or DIY diffuser.
- Consider a Fill Light: If you have harsh shadows, add a less intense light source or a reflector on the opposite side.
- Experiment with a Backlight: For added depth, place a third light (like a desk lamp) behind you.
- Check Your Background: Make sure your background isn't too dark or too cluttered, and that your backlight is creating separation.
- Record and Review: Do short test recordings to see how the lighting looks. Adjust until you're happy.
By following these steps, you are actively engaging in studio design and optimization, enhancing your production quality, and overcoming equipment limitations. You'll be amazed at the difference simple lighting adjustments can make!
Tools & Resources to Support Your Growth
Improving your lighting is a huge step in enhancing your video quality, which is crucial for retaining viewers and growing your channel. But lighting is just one piece of the puzzle. To truly build a successful YouTube channel, you need a solid strategy, compelling content ideas, and efficient workflow.
This is where tools like Subscribr come in. While you're mastering your lighting setup, Subscribr can help you with everything else. Use Subscribr's Channel and Video Intel features to analyze what's working for other channels in your niche (including how they might be using lighting effectively in their setups). Their Research Assistant can help you dive deep into topics for your videos, ensuring your content is as high-quality as your lighting. And when you're ready to write, Subscribr's AI Script Writer can help you structure your videos, write engaging hooks, and craft compelling calls to action, so your improved video quality is paired with top-tier content. Subscribr empowers you with the strategy and content creation tools needed to leverage your improved production value for channel growth.
Conclusion
You absolutely do not need professional lights to make your YouTube videos look brighter and more professional. By understanding the basic principles of lighting and creatively using natural light, household items, or affordable dedicated lights, you can achieve significant improvements.
Start simple, experiment with what you have, and gradually build your setup as your channel grows. Focusing on good lighting is one of the most impactful things you can do to improve your video quality, keep viewers engaged, and overcome the initial hurdles of starting your YouTube journey on a budget. Now go turn on some lights and start filming!


